How to Connect MongoDB Atlas with Node js using Mongoose
In this article, we are going to create a simple express backend. The express app will connect to a MongoDB database in the cloud with CRUD operations. We will use Mongoose to create models with schema validation.
We will host our database in the cloud with MongoDB Atlas.
At the end we will test our app using Postman.
The purpose of this article is to setup a basic express app and connect i to MongoDB as fast and simple as possible. I will not go into great detail of each subject, but rather go through each step.
Let’s get started.
Setting up a Database in MongoDB Atlas
MongoDB Atlas is a cloud solution where we can host our database. It has a free tier with a max storage of 512 MB. This is ideal for experimentation and learning.
Get started by going to the MongoDB Atlas website and sign up as new user.
Next, choose the Shared Clusters.

Then choose your cloud provider and region.
Select Google Cloud Platform as your provider.
Since I live in Europe, I choose Belgium as my region. Choose the one near your location of the recommended location.

Your cluster is now being created. It takes a couple of minutes to set up. Go grab a cup of coffee and it will be finished when you are back :).

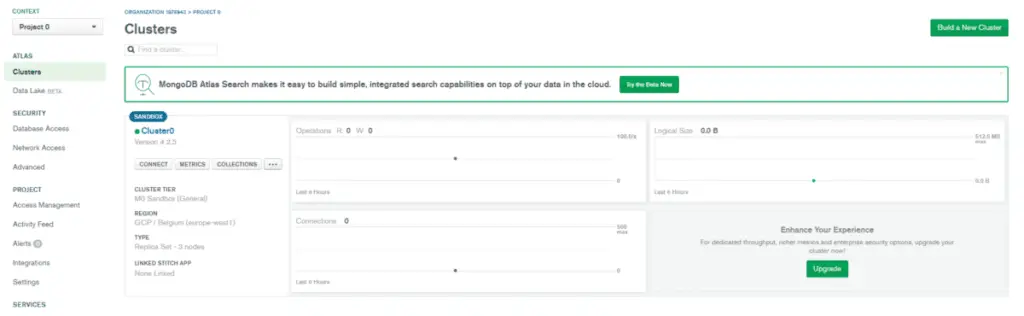
When the cluster has finished setting up, your screen should look something like this:
Click connect.

Next you need to whitelist your IP address and create a MongoDB user.

- Click on “Add Your Current IP Address”. Your IP Address should be filled out automatically, so just click “Add IP Address”.
- Add a username and password for your MongoDB user. I’ve entered test as username and 123 as a password. Click “Create MongoDB User”.

Click “Choose a connection method”.

Next, you choose how to connect to your cluster. Select “Connect your application”.

Now our database is ready. Here we have access to our connection string we will use in our express application.
Keep the tab open, we will come back to it later. We will now go and create our express backend.

Create an Express Backend
Open your favorite code editor in a new folder. I will be using vs code.
Create a new package.json file by typing this in the command line.
npm init -yInstall express and mongoose.
npm install express mongooseI will also suggest installing nodemon. This will watch your JavaScript files and automatically restart the server every time one of the files has changed. There are numerous times where I’ve had something not working, spent a lot of time debugging, only to find out I’ve not restarted the server.
You can install the package in your project or globally. I’ve chosen to install it globally:
npm install -g nodemonCreate a new file called server.js and paste in the following code.
You need to go back to the mongoDB Atlas website and copy your connection string and paste it as your uri. Check the last step of setting up your MongoDB Atlas DB.
// server.js

const express = require('express');
const mongoose = require('mongoose');

const app = express();
const port = 5000;

app.use(express.json());

const uri = "mongodb+srv://test:123@cluster0-vnelr.gcp.mongodb.net/test?retryWrites=true&w=majority;"

mongoose.connect(uri, { useNewUrlParser: true, useCreateIndex: true, useUnifiedTopology: true });
const connection = mongoose.connection;
connection.once('open', () => {
    console.log("MongoDB database connection established successfully");
});

app.listen(port, () => {
    console.log(`Server is running on port: ${port}`);
});
Type in nodemon server. If everything works as it should, you will see something like this.

Great, the express app is up and running.
Next, we will create our models and start interacting with our database with the help of Mongoose.
Interact with the MongoDB with Mongoose
In this tutorial we will create a simple user collection. This will only contain a single field named username.
We will now create our user model. This will add our model with the Schema. This will contain which type it is and validation logic like required, that is is unique, trim empty characters and set minimum length.
Create a file called user.model.js and paste in the following code.
// user.model.js

const mongoose = require('mongoose');

const Schema = mongoose.Schema;

const userSchema = new Schema({
    username: {
        type: String,
        required: true,
        unique: true,
        trim: true,
        minlength: 3
    },
}, {
    timestamps: true,
});

const User = mongoose.model('User', userSchema);

module.exports = User;
Then we will create our routes. This is the API endpoints with the following crud operations:
- Get all users
- Add a user
- Get specific user
- Delete user
- Change user
Create a file user.route.js and paste the following
// user.route.js

const router = require('express').Router();
let User = require('./user.model');

router.route('/').get((req, res) => {
    User.find()
        .then(users => res.json(users))
        .catch(err => res.status(400).json('Error: ' + err));
});

router.route('/add').post((req, res) => {
    const username = req.body.username;
    const newUser = new User({ username });

    newUser.save()
        .then(() => res.json('User added!'))
        .catch(err => res.status(400).json('Error: ' + err));
})

router.route('/:id').get((req, res) => {
    User.findById(req.params.id)
        .then(exercise => res.json(exercise))
        .catch(err => res.status(400).json('Error: ' + err));
});

router.route('/:id').delete((req, res) => {
    User.findByIdAndDelete(req.params.id)
        .then(() => res.json('User deleted.'))
        .catch(err => res.status(400).json('Error: ' + err));
});

router.route('/:id').put((req, res) => {
    User.findById(req.params.id)
        .then(user => {
            user.username = req.body.username;

            user.save()
                .then(() => res.json('User updated!'))
                .catch(err => res.status(400).json('Error: ' + err));
        })
        .catch(err => res.status(400).json('Error: ' + err));
});

module.exports = router;
Then we need to add the user route to our server.js file.
// server.js

const userRouter = require('.user.route');
app.use('/user', userRouter);
Now we are finished with the code.
The complete server.js file looks like this:
const express = require('express');
const mongoose = require('mongoose');
const userRouter = require('./user.route');

const app = express();
const port = 5000;

app.use(express.json());
app.use('/user', userRouter);

const uri = "mongodb+srv://test:123@cluster0-vnelr.gcp.mongodb.net/test?retryWrites=true;"

mongoose.connect(uri, { useNewUrlParser: true, useCreateIndex: true, useUnifiedTopology: true });
const connection = mongoose.connection;
connection.once('open', () => {
    console.log("MongoDB database connection established successfully");
});

app.listen(port, () => {
    console.log(`Server is running on port: ${port}`);
});
Test with Postman
Now, let’s test out API with Postman.
Add a New User
To add a new user, make sure you are running your express app.
Open up Postman and enter the following:
- Change the verb to POST.
- Enter the URL http://localhost:5000/user/add
- In the request body, choose raw
- Choose JSON (application/json)
- In the body, create a JSON object with a username field like illustrated below
- Press “Send”

When trying to add a user, I got this error message:
“Error: MongoWriteConcernError: No write concern mode named ‘majority;’ found in replica set configuration”
Even though we get this error, the user gets added to the MongoDB.
After some googling, I found out it was some conflict with the version in MongoDB Atlas. To fix this issue, need to remove &w=majority from the URI in server.js. In my case, it will look like this:
const uri = "mongodb+srv://test:123@cluster0-vnelr.gcp.mongodb.net/test?retryWrites=true;"Now try to add the user again. You should see “User added!” as the output:

You can check the content of the database in the MongoDB Atlas website.
Select the Cluster and Collections.

Get Users
To get all users, enter http://localhost:5000/user/ as the address. Remember to select the verb as GET.
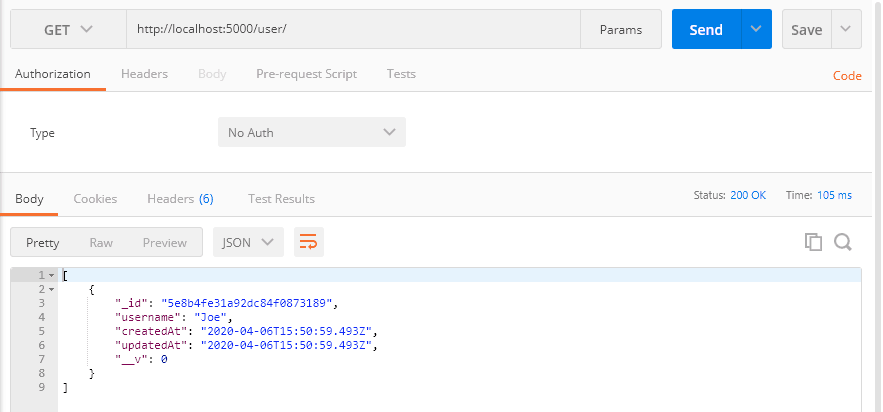
Copy the value of the "_id" field. We will need it to get a specific user.
Get a Specific User
Get the data of a specific user by entering this URL: http://localhost:5000/user/{your id}

Change an Existing User
Change an existing user by using the PUT verb. Then change the value of the JSON object. The URL is the same as when we fetched the specific user.

Delete a User
To delete a user, you only need to change the verb to DELETE.

We can verify that the user is gone by fetching all the users.

Now we have a fully working express backend connected to a MongoDB database.