What is GitHub and how does it work?
In short, GitHub is a place where you can share your files in public, most often it is some sort of software development project. Other people can download the code, modify it, and submit it to GitHub. This makes it a great platform for collaborating with likeminded. GitHub is often called a social networking site for developers.
But before we can go into details on what GitHub is, we need to first understand what Git is.
What is Git?
Git is a version control system (VCS). Each time you commit a file to a version control system, you will keep all the history from that file since the file was created.
This means you can go back to a specific point when the file was saved. It could be you had some code which you deleted, but you now need.
You have the freedom to experiment with your code and nothing is lost because everything you ever did is stored in the version control system.
Git was created by Linus Torvalds who is the creator of Linux.
What is GitHub?
We just discussed Git and that it is a version control system. We usually commit our files to Git in a local directory on our computer.
GitHub, on the other hand, is the public repository where we store our files. Now other developers can download (or clone) our files, and they will get access to the entire Git history of our files.
These developers can then continue coding on these files and send what is called a pull request. This means that the main author of the project in GitHub can include this pull request into the project.
The changes will then, in turn, get included in the history of the source file.
So to recap. Git is the version control system, where we keep the various versions and our history of the files. GitHub is where we can share our work and collaborate with other developers.
Is GitHub free?
GitHub is free when you work with public or open sourced projects.
If you, however, need to have a private project which other can’t access, you need a paid plan.
Prices are currently $7/month for a single developer. There are different prices for businesses. Check out their pricing plans for further information.
Should you use GitHub when working on a solo project?
You should definitely use Git when working on a solo project. Getting a history of your commits and being able to compare changes against the previous “working” version is extremely powerful.
If you are working on a project between different machines, it would be beneficial to use GitHub. You can easily clone your latest version from GitHub and continue your work.
Be aware that if push your code to GitHub, the code will be available for everyone to download, unless you obtain a private paid repository.
How can you use GitHub in your career?
When applying for a job, you might have a hard time getting the position, or even get to an interview. Especially if you have little or no experience in coding.
It cost a lot of money for companies to hire developers. They have to pay wages, pensions, and other benefits. Recruiters are often worried that an unproven developer might fail at giving value to the company, even though you know you can create excellent applications.
What you can do to get ahead of the curve is to create a GitHub repository. Find out what technologies you want to work with and create some small applications where you display your skills.
Then simply attach the URL to the GitHub repository in your CV.
You can also participate in open source projects. This will display to the recruiters that you have a passion for your craft. Remember, companies don’t care about your grades in school. They are interested in knowing that you can develop useful applications for them.
What is open source projects?
Open source in respect with coding is that code is available to the masses. Everyone has access to the code and the content is open for modification.
There are a lot of companies which are making their code available for open source. This wasn’t the case some years ago. Then the source code was considered a company secret.
Now, however, even big companies like Microsoft are making a lot of their code open source.
A great benefit for the users is they don’t need to wait for the company owning the software to fix bugs or add features. You can just clone the repo and fix it yourself!
From the company’s point of view, they get input from the community to add new features and fix bugs on a scale they couldn’t do on their own.
The community can have Ideas which the company didn’t have. So the possibility to deliver quality increases with open source.
How do you get involved with open source?
You can get started with open source in two different ways. Either start an open source project by yourself or participate in an existing project.
Feel free to start a brand new project on your own. If you have an Idea for a tool/library/application, just get started.
If you don’t have an Idea, however, you should participate in an existing one. Here are some suggestions for doing just that:
- Find a project which you are already using and are familiar with. Go to their GitHub page and clone the project. Get familiar with the code. Develop a basic understanding of how the application works.
- Look at the commits which have been done. Learn how other people are contributing to the project. This way you will understand what is expected when you are contributing on your own.
- When contributing to a project, start with doing some boring or tedious task. Maybe a bug fix which people are reluctant to do. It is sometimes hard to get a contribution accepted, but if you do something that needs to be done, but others don’t want to do, it will be easier to get it accepted. That way you can get a foot in the door and later you will be trusted in doing bigger stuff.
Diving into an open source GitHub repository will skyrocket your learning if you are a beginner. If you are looking into some popular and respected JavaScript library for instance, most likely the code is following best practices.
Downloading the code and playing around with it is one of the best ways to elevate your skill as a developer.
Terminology
Before getting into the details of Git and GitHub, I want to just go through the terminology. I will just be covering the basics in this section.
Repository
A repository is the essential component of GitHub. This is the projects folder containing all the project files.
The GitHub repository contains the revised history of all the files inside the project.
Clone
When you are cloning a repository you are essentially downloading a copy of the repository down to your computer. This is something you usually do when you want to play around with the code.
To clone a project, you need to go to the GitHub web page for that repository. There you can find a “clone or download” button. You can choose to just download the repository from the web page and open the project in your favorite IDE. Or you can clone it from your terminal with the command git clone <repository URL>.
Commits
This is where your changes in your files are saved to the local repository. When this happens your files will get a new snapshot, meaning in the future you can compare your files against that commit or even revert from your existing changes to that version.
Remember that this is a Git feature. When you do a commit, your changes will not automatically get updated to GitHub.
Branch
Branching is when you are working in parallel with the main code. That way you can mess around with the code without messing with the main development branch.
A good practice is to create a new branch when working on a new feature. In that branch, you can do multiple commits, revert back if you have regrets etc. You can do this as much as you want, and when you are happy, you can include your changes back into the main branch.
Merge
Merges is what you do when you are content with your branch. You merge your changes back into the main development branch. There may be other developers who have done some work on the same files you have worked on meanwhile. In that case, there might be a conflict which you need to handle.
Push
This is where you upload your changes to a remote repository like GitHub. All your committed history will also be uploaded.
Often people will do a push right after they are doing a commit. It is the safest thing to do in case something unforeseen happens like a computer crash.
Fetch
To get the latest version from a remote repository. This won’t merge the content to your local repository. The modified content you are fetching doesn’t change your local branch, but you have the opportunity to compare changes.
Pull
A pull is essentially doing a fetch and a merge. You will then get the latest version from the GitHub repository.
Issues
This is bugs, improvements or questions which is linked to your GitHub repository. Anybody can submit an issue to the repository.
Blame
This is where you can see the latest changes done in a single file. You can display who did what and when.
Pull request
Let’s say you have been using an application which is on GitHub and you have fixed a bug. In order to get your changes into the GitHub repository so other people can benefit, you have to do a pull request.
This means you are requesting to the people that are maintaining the repository to merge your code. The maintainers will look through your code and either accept or reject the pull request.
Fork
When you fork a repository you are creating a copy of that repository into your own GitHub repository. Here you can make changes without affecting the original repository. You can choose to take the project in a completely different direction. Hence the “fork”.
Setting up and getting started with a local Git repository
1. Download and install Git
Go to https://git-scm.com/downloads. Here you can download Git for Windows, Mac and Linux/Unix,
After you have downloaded Git, install it and follow the setup instruction.
2. Initialize your repository
Make sure you have a folder where you will keep your project files.
Navigate to that folder with a terminal. For example: ‘d:\project\my-project\’.
Now, execute the command git init.

You have now created your repository.
3. Add a file to your repository
When you are adding new files to your project folder, remember that your file doesn’t automatically get added to your repository.
You need to add it with the git add command.
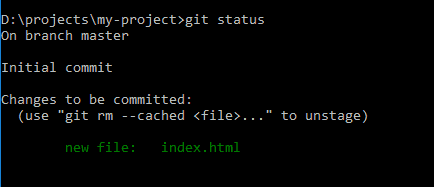
If you want to try it out, just add an index.html file in your project folder. Then type in this command in the terminal: git add index.html. You can also use the command git add * to add all your files within your repository.
Now your file is added to the repository. This means it is ready to be included in a commit. We will do that in the next step.
You can verify that index.html is ready to be committed by typing in the command git status.
4. Commit your changes
Now that we have added our index.html file, we are ready to commit it. You can do this by executing the following command:
git commit -m “My first commit”.
We are adding the -m attribute following a message. This is something you always should do because then we are describing what this commit is doing.
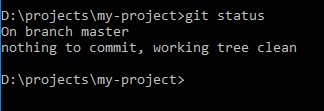
This commit will now be visible when we view the revised history of the index.html file. To see the commit you just did, you can type git log. There you will see the author and the time of the commit.
When you now do a git status. You will get a message that there is nothing to commit.
5. Push to a remote repository
Now we usually want to push our latest changes to a remote repository like GitHub. We do that by using the git push command.
If you haven’t set up a GitHub account yet, this won’t work. Follow the steps in the next section, and we will revisit this step there.
Getting started with GitHub
1. Sign up for a GitHub account
Go to https://github.com/join to set up an account.
Step 1: Fill in your username, password an e-mail address.
Fill in the required information and press continue.

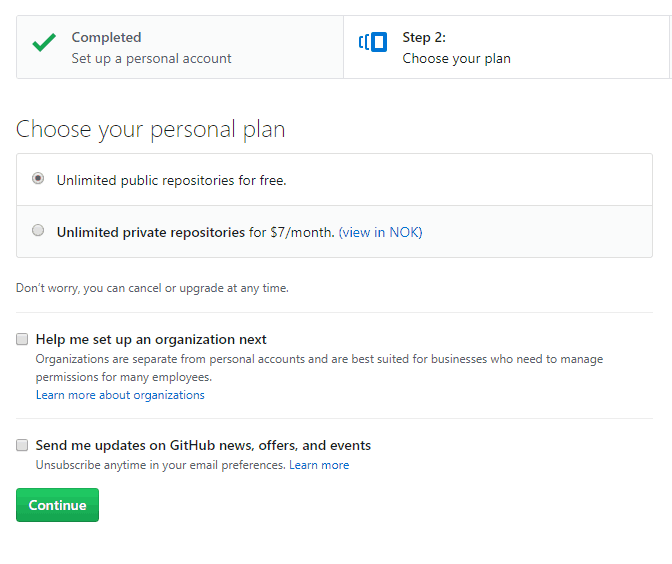
Step 2: Choose your plan
Choose the free unlimited public repository and hit continue.
Step 3: Additional information about yourself (optional)
Here you can fill out your experience level, what you plan to do with GitHub and a little bit more about yourself.
This step is optional. Fill it out if you like.

Nice! Now you have your own GitHub account!
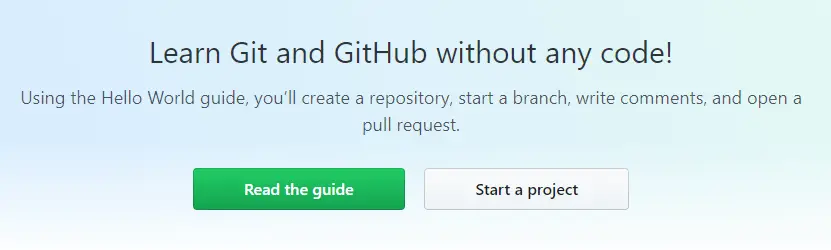
2. Start a new project
Click the “Start a project” button.
You might need to verify your e-mail address if you have not already done so.
3. Create a new repository
Enter your repository name. Add a description (optional). Leave the radio button to “public”.
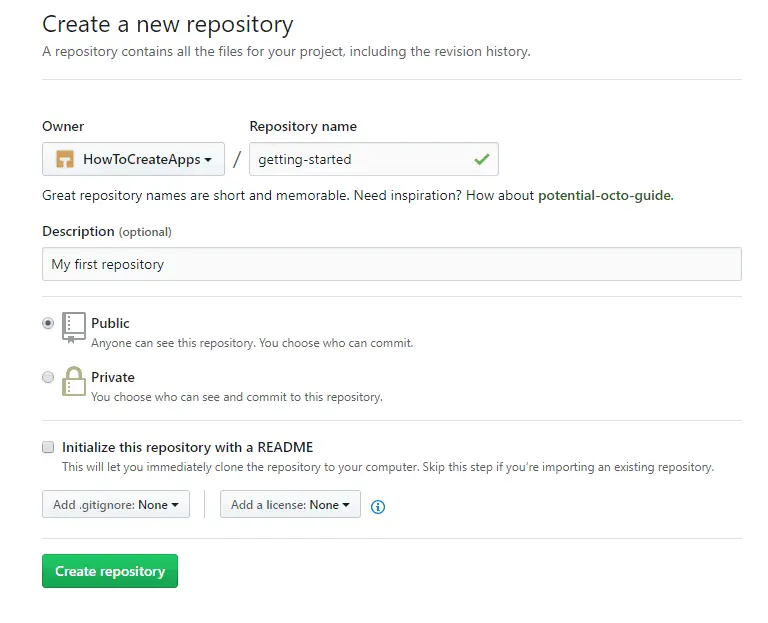
After you hit “Create repository”, you will be directed to your empty repository.
4. Push your local Git repo to GitHub
Now we will push our Git repository we created in our previous section to GitHub.
First, you need to add a remote repository. Go to your local repository with your terminal and type the command git remote add <name> <url>. In my example, I typed in git remote add origin https://github.com/HowToCreateApps/getting-started.git. You can find your URL by going to the web page of your repository and click the button “clone or download”.
The type git push -u origin master. You might need to login to GitHub to authenticate your user.
Then you can browse to your GitHub repository and see that your index.html file was uploaded.
Conclusion
In this article, we have discussed what GitHub is. And since Git is an essential part of GitHub we have discussed that as well.
When you are working as a professional developer of any kind, you will be using a source control solution. There are several solutions, but Git has become by far the most popular.
In that respect, I highly recommend you learn and get comfortable with Git and Github.
In this post, we have just been scratching the surface. We have set up Git and GitHub and created a local repository which we then pushed to GitHub.
There are, however, much more we haven’t covered here, like branching, forking, pull requests, etc. To dive deeper and expand your skills with Git and GitHub, I would recommend this course on Udemy: GitHub Ultimate: Master Git and GitHub – Beginner to Expert.
Before ending this article I just want to list the benefits of using Git and GitHub.
The benefits of Git:
- You get a history of every commits you have created. This gives you the ability to compare the different commits and even return to a previous commit.
- Branching and merging are easy. You can develop a new feature without messing with the main development branch.
- Can be used on any kind of projects.
- You have the ability to work offline, and you can just push your changes to a remote repository when you are back online.
The benefits of GitHub:
- You have access to your code anywhere from any machine.
- Easy to share your code with others.
- Great way to show your projects when applying for jobs.
- Excellent for open source.