
How to use Local Storage in Vue.JS – A step by step Tutorial

Vue.js is a very popular JavaScript frontend framework that is experiencing tremendous growth because of its simplicity, minimalism, and good performance.
JavaScript frameworks help us create not only modern web apps but also desktop and mobile apps. During the creation of an app, we find that we need ways to persist data so that users don’t lose their state of the app between sessions.
LocalStorage is an inbuilt web storage API in modern browsers, that allows web apps to store and access data locally with no expiration date. Earlier on before the introduction of LocalStorage, apps had to store data in cookies, which are included in every server request. Moreover, cookies are limited to 4096 bytes.
Now, you can create a complete offline Vue.JS app with LocalStorage as your data store.
What we Will Create
Apparently, there are not enough ‘Todo Apps’ in the world, in this tutorial:
- We are going to create our very own, from scratch using Vue CLI.
- We will use LocalStorage to persist our todo items.
- We will add some styling with Bootstrap 4 to make the user interface look good.
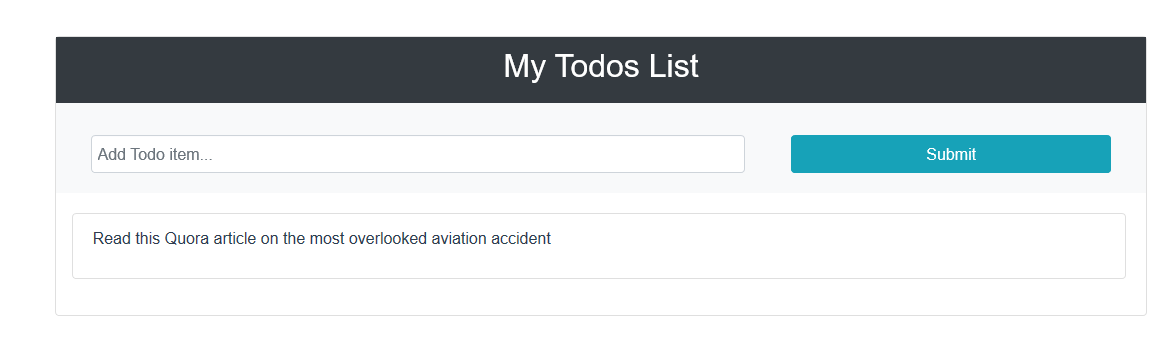
This is what the app will look like on mobile: with items and without items.

Here is the desktop browser view:
Let’s Get Started
#1 Creating the project with Vue CLI
To create the project with Vue CLI we first need to install it and to install it, we need npm. NPM is a JavaScript package manager that comes with Node.js. Thus, we must have Node.js already installed on our machine to get started. You can download it freely from Node.js website. Installing Node.js automatically installs npm alongside. You can confirm that it’s installed by running the command in your terminal:
npm -vIt should display a version number.
Next, we can install the Vue CLI using npm by running the following command:
npm install -g @vue/cliThe -g flag installs Vue CLI globally, hence you do not need to run it again when creating future projects unless you have uninstalled node.js or you are on a new machine.
Once Vue CLI is installed, you can run the following command to confirm its version.
Vue --versionWe are now ready to create our app. We will name the app todo_app. Navigate to a folder where you want to place your code and run the following command to create the project.
Vue create todo_appIt will ask you to select a preset:

We will go with the default; select default with the arrow keys and press Enter to proceed. The command runs for a few minutes and creates your project.
#2 Running the starter app in the browser.
The Vue starter app has been installed and you can view it in your browser. While still on your terminal, navigate to the todo_app folder by typing the command:
cd todo_appThen use the npm run serve command to launch a local webserver:
npm run serveThe command compiles the code and displays the output below.
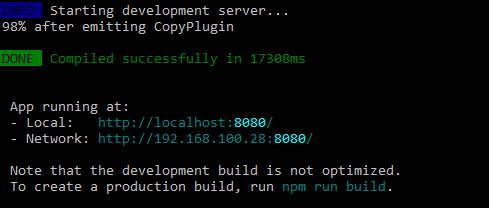
You may copy the URL and paste into your browser to see the Vue starter app.

By the end of this tutorial, we will have completely changed things here. With the development server still running on the terminal, any changes you make in your code will reload the page and display automatically without you having to reload the web page.
#3 Installing the Vue dev tools browser extension.
At this point, I would suggest you install the Vue.js dev tools extension for Chrome or Mozilla Firefox, depending on your choice of browser. It’s a nice tool that helps inspect Vue apps and see details such as root, prop, components, events, and more. To gain more insight into the features of Vue.js, I would suggest you visit the user-friendly Vue.js documentation.
The Vue browser extension adds a Vue tab to your dev tools panel. So far, our app does not have much, here are the Vue Dev tools in action.

#4 Creating the Todos Component.
Depending on your IDE, your project folder-tree should show up like this:

We will be creating our own components, so you can delete the HelloWorld component file and all its references from the App.vue file. The App.vue file contains the root of the Vue app – basically, it will hold all the components that make up our Todos App. This is also the file where you define your global styles in the <style> tag. You may add styles specific to a component by adding scoped to the style tag. The <script> tag holds the JavaScript objects that define the components. We will add methods and data properties as we go along with the tutorial.
Your App.vue file should look like this:
<template>
  <div id="app">
  </div>
</template>

<script>
export default {
  name: 'app',
  components: {
  }
}
</script>

<style>
#app {
}
</style>
Under components directory, create a file named Todos.vue. The list of to-do items will go into this file. Add the following code to the file. Note that the <template> tag can only hold one root element. If you add more than one, it results in an error. Thus, we usually wrap all other elements inside the <div> tag:
<template>
    <div>
        <h1>My Todos List</h1>
    </div>
</template>

<script>
    export default {
        name: "Todos"
    }
</script>

<style scoped>
</style>
In the above snippet, we have initialized the Todos component; we can import it into our App.vue and use it. Replace your App.vue with the following code to effect this change.
<template>
  <div id="app">
    <Todos/>
  </div>
</template>

<script>
  import Todos from './components/Todos.vue'

export default {
  name: 'app',
  components: {
      Todos
  },
    data() {
      return {
          todos : []
      }
    }
}
</script>

<style>
#app {
  font-family: 'Avenir', Helvetica, Arial, sans-serif;
  -webkit-font-smoothing: antialiased;
  -moz-osx-font-smoothing: grayscale;
  text-align: center;
  color: #2c3e50;
  margin-top: 40px;
}
</style>
If you check your browser, you should see the title we added in the Todos component. You have created your first component and imported it.
If you check your Chrome Vue Dev tools tab, you should see the Todos component that we added:

#5 Working with data.
Our app will be displaying a list of Todos, which in this case is our data. In Vue, we define data to be used by components inside the data object, as seen in the App.vue code snippet shared earlier. Basically, it looks like this:
data() {
  return {
      todo_items: []
  }
}
We define the todo_items array, which is currently empty; it will be used to hold the list of todo items that will be passed to the Todos component. To attach the data to the component, we use a Vue directive called v-bind. Modify your App.vue file and replace the template tag with the following snippet:
<template>
  <div id="app">
    <Todos v-bind:todo_items="todo_items"/>
  </div>
</template>
The v-bind directive passes data from the parent component (App.vue) to the child component (Todos.vue) as a prop. To access the data in the Todos component, we use the props property. Modify your Todos.vue and add the props so your <script> tag looks like this:
<script>
    export default {
        name: "Todos",
        props: ["todo_items"]
    }
</script>
The props allow us to access the todo_items inside the Todos component. The todo_items variable is passed in as an array, so we will need to loop through the items as we populate the user interface. v-for is a Vue directive for looping through a list. However, for v-for to work correctly, we need a key. We bind keys to the component using the v-bind:key directive. Keys must be unique. Each todo_item will have the properties: id, title. The id property is unique and will be used as the key.
todo_item
    {
        id:0,
        title: "This is a title",
    }
#6 Creating the TodoItem component.
Create a new file under the components directory and name it TodoItem.vue. We want each todo_item to be a component. Splitting the user interface into smaller components that achieve a certain task makes code maintenance easier. Now, paste the following code into the TodoItem.vue
<template>
    <div>
        <p></p>
    </div>
</template>

<script>
    export default {
        name: "TodoItem"
    }
</script>
Next is to import this component into the Todos component as a child and declare it.
<script>
import TodoItem from './TodoItem.vue';
    export default {
        name: "Todos",
        props: ["todo_items"],
        components: {
            TodoItem
        }
    }
</script>
We import the component, then declare it under the components property. We can then use it to loop the data by invoking the v-for directive. Your Todos.vue file should now look like this:
 <template>
    <div>
        <h1>My Todos List</h1>
        <div v-bind:key="todo_item.id" v-for="todo_item in todo_items">
            <TodoItem v-bind:todo_item="todo_item"></TodoItem>
        </div>
    </div>
</template>
<script>
import TodoItem from './TodoItem.vue';
    export default {
        name: "Todos",
        props: ["todo_items"],
        components: {
            TodoItem
        }
    }
</script>
This line below passes data from Todos.vue to TodoItem.vue
<TodoItem v-bind:todo_item="todo_item"></TodoItem>
To use this data, you should modify the TodoItem file to look like this:
<template>
    <div>
        <p>{{todo_item.title}}</p>
    </div>
</template>

<script>
    export default {
        name: "TodoItem",
        props : ["todo_item"]
    }
</script>
If the todo_items array in the App.vue file had some data, it would show up in your UI. Let’s add some todo_items and see how they show up in the browser. Go to your App.vue and modify the todo_items array as per the code below.
todo_items : [
    {
        id:0,
        title: "First Title"
    },
    {
        id:1,
        title: "Second title"
    },
    {
        id:2,
        title: "Third title"
    },
    {
        id:3,
        title: "Fourth title"
    }
]
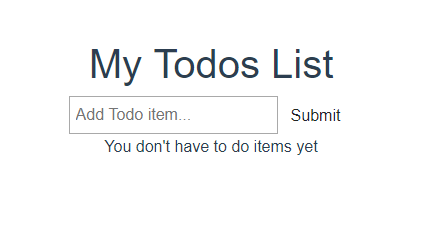
The items should show up in your browser as shown below. So far, so good.

Now, delete the items and leave the array empty for fresh data that users will be adding.
#7 Saving data to LocalStorage.
You save the user’s data so that it can persist between application states. LocalStorage saves data in the form of key-value format. You use the setItem method:
localStorage.setItem("key", "value");
We need to create an AddTodoItem Vue component that will have the field for adding an item. Each todo item should have a unique id; we will use an npm package called uuid to generate unique ids. Open a new terminal session and run the command to install uuid:
npm install uuidNow we can use the uuid package in our code. Uuid has different versions, we will be using v4 in this project; please read the uuid docs for more information. Create a file called AddTodoItem.vue under the components directory and add the following code.
<template>
    <div>
        <form @submit="addTodo">
            <input type="text" v-model="title" name="title" placeholder="Add Todo item...">
            <input type="submit" value="Submit" class="btn">
        </form>
    </div>
</template>

<script>
    import uuid from 'uuid/v4';
    export default {
        name: "AddTodoItem",
        data(){
            return {
                title: ''
            }
        },
        methods: {
            addTodo(e){
                e.preventDefault();
                const newTodoItem={
                    title: this.title,
                    id: uuid()
                }
                //send to parent
                this.$emit('add-todo-event', newTodoItem);
                //clear the field
                this.title='';
            }
        }
    }
</script>
The above component just creates a field for the user to enter a title. We have included the v-model directive which binds a component’s data to the input field in a reactive manner – any change to the text field is reflected automatically on the data and vice versa. You can also see the emit method; remember the AddTodoItem.vue component will be a child of the App.vue component. To pass data based on user actions from a child component to the parent component, we “emit” an event. We expect a user to fill the text field and hit submit; this emits an event referred to as “add-todo-event” in our code. Next, you set the parent component to listen to this event emitted from the child. We will do so in the App.vue component.
Import the AddTodoItem component into the App.vue component, then implement it such that the text field appears just above the list of todo items. Remember the emitted event – add-todo-event, you pick the event and assign it to a method, we will call it “addTodoMethod” The template tag in your App.vue should look like this:
<template>
  <div id="app">
    <h1>My Todos List</h1>
    <AddTodoItem v-on:add-todo-event="addTodoMethod"></AddTodoItem>
    <Todos v-bind:todo_items="todo_items"/>
  </div>
</template>
And your browser should show something like this:
Launch Dev Tools and check the Vue panel; try typing something into the text field and you will see the title variable change automatically. This is simply the reactive characteristic of Vue.

If you hit the submit button and check the “Events Tab” of your Vue panel, you should see the emitted event and its data.

Our app is working fine so far, we can now implement the addTodoMethod. This method doesn’t do much apart from adding the item to the todo_items array. As we had mentioned, Vue.js is a reactive framework, any changes on the array will be reflected automatically on the user interface; you do not need to implement anything else. In fact, this method will have only one line. We use the spread operator(…) to update the array by adding to it, rather than overwriting it.
addTodoMethod(newTodoItem){
      this.todo_items = [...this.todo_items, newTodoItem]
}
Up to this point, if you type something in the text field and hit submit, it will show up in your browser, however, when you reload the page, the items disappear, because we are not yet persisting them to some storage. Your App.vue should look like this:
<template>
  <div id="app">
    <h1>My Todos List</h1>
    <AddTodoItem v-on:add-todo-event="addTodoMethod"></AddTodoItem>
    <Todos v-bind:todo_items="todo_items"/>
  </div>
</template>

<script>
  import AddTodoItem from './components/AddTodoItem.vue'
  import Todos from './components/Todos.vue'

export default {
  name: 'app',
  components: {
      Todos,
      AddTodoItem
  },
    data() {
      return {
          todo_items : []
      }
    },
    methods: {
        addTodoMethod(newTodoItem){
            this.todo_items = [...this.todo_items, newTodoItem]
      }
    },
    }
</script>
<style>
#app {
  font-family: 'Avenir', Helvetica, Arial, sans-serif;
  -webkit-font-smoothing: antialiased;
  -moz-osx-font-smoothing: grayscale;
  text-align: center;
  color: #2c3e50;
  margin-top: 60px;
}
</style>
Next we need to implement another method that watches for changes on the todo_items array and automatically saves to LocalStorage. Vue already has a method called Watch, you just need to override it with your code. The watch method has a Boolean property called Deep that you set to true; this is to inform the Vue instance that it should watch for changes to the nested data, i.e. the array of todo_items. Since LocalStorage can only save strings, you must convert the array of objects into a string. You will use the JSON.stringify method.
Here is an implementation of the watch method:
watch: {
    todo_items: {
        handler() {
            console.log('Todo Items array changed!');
            localStorage.setItem('todo_items', JSON.stringify(this.todo_items));
        },
        deep: true,
    },
},
Up to this stage, the <script> tag in your App.vue should look like this:
<script>
  import AddTodoItem from './components/AddTodoItem.vue'
  import Todos from './components/Todos.vue'

export default {
  name: 'app',
  components: {
      Todos,
      AddTodoItem
  },
    data() {
      return {
          todo_items : []
      }
    },
    methods: {
        addTodoMethod(newTodoItem){
            this.todo_items = [...this.todo_items, newTodoItem]
      }
    },

    watch: {
        todo_items: {
            handler() {
                console.log('Todo Items array changed!');
                localStorage.setItem('todo_items', JSON.stringify(this.todo_items));
            },
            deep: true,
        },
    },
}
</script>
Up to this point, your app can persist the user’s data. Try saving something and open your Chrome Dev tools > LocalStorage. You should see the array of items:

#8 Loading data from LocalStorage.
The goal is to populate the todo_items array with data from LocalStorage. To achieve this, we listen to an event that’s fired when the app mounts, then load the data. Vue has a method called mounted() that is called when the app has been created in the DOM. Inside this method we can add our code to perform certain functions; in this case, we want to get an array of todo items. You retrieve data from LocalStorage using the getItem method:
var items = localStorage.getItem(“key”); Remember you had stringified the array, so you have to convert it back to an array using the JSON.parse method. You must first check if there’s a todo_items key in the LocalStorage, then load its contents – because at first run, the key won’t be there and you don’t want your app to crash. Here is how you achieve this:
mounted(){
  console.log('App Mounted');
    if (localStorage.getItem('todo_items'))
        this.todo_items = JSON.parse(localStorage.getItem('todo_items'));
}
The above method reads from LocalStorage and sets the todo_items array, which automatically populates the user interface. Add some items and refresh the page; you will notice that your to do items are still there.
#9 Improving the user experience
We will be using Bootstrap v4, so let’s include it in the <head> of index.html file.
  <!-- bootstrap -->
<link rel="stylesheet" href="https://stackpath.bootstrapcdn.com/bootstrap/4.3.1/css/bootstrap.min.css" integrity="sha384-ggOyR0iXCbMQv3Xipma34MD+dH/1fQ784/j6cY/iJTQUOhcWr7x9JvoRxT2MZw1T" crossorigin="anonymous">
Now we can use Bootstrap’s CSS classes.
The first time the app launches, the array will be empty, we use the v-if directive to check for an empty array and notify the user accordingly; it’s just good user experience. In the Todos.vue file, above the todo items.
<p v-if="!todo_items.length">Your Todo List is empty. Add something! </p>
Add a header component and import it into the App.vue component. Create a Header.vue file under the components folder and add the following code;
 <template>
    <header class="card-title bg-dark header">
        <h2>My Todos List</h2>
    </header>
</template>

<script>
    export default {
        name: "Header"
    }
</script>

<style scoped>
    .header{
        color: #ffffff;
        text-align: center;
        padding: 10px;
    }
</style>
Your Todo List App with Vue.js and LocalStorage is now complete.
Just to recap, here are the complete file codes with Bootstrap classes added for styling. Here is a challenge: improve the styling and make your app extremely appealing!
App.vue
<template>
  <div id="app" class="card center_div">
    <div class="sticky-top bg-light">
      <Header></Header>
      <AddTodoItem v-on:add-todo-event="addTodoMethod"></AddTodoItem>
    </div>
    <div class="overflow-auto">
      <Todos v-bind:todo_items="todo_items"/>
    </div>
  </div>
</template>

<script>
    import Header from './components/Header.vue';
  import AddTodoItem from './components/AddTodoItem.vue'
  import Todos from './components/Todos.vue'

export default {
  name: 'app',
  components: {
      Header,
      Todos,
      AddTodoItem
  },
    data() {
      return {
          todo_items : []
      }
    },
    methods: {
        addTodoMethod(newTodoItem){
            this.todo_items = [...this.todo_items, newTodoItem]
      }
    },
    mounted(){
      console.log('App Mounted');
        if (localStorage.getItem('todo_items'))
            this.todo_items = JSON.parse(localStorage.getItem('todo_items'));
    },
    watch: {
        todo_items: {
            handler() {
                console.log('Todo Items array changed!');
                localStorage.setItem('todo_items', JSON.stringify(this.todo_items));
            },
            deep: true,
        },
    },
}
</script>

<style>
#app {
  font-family: 'Avenir', Helvetica, Arial, sans-serif;
  -webkit-font-smoothing: antialiased;
  -moz-osx-font-smoothing: grayscale;
  text-align: center;
  color: #2c3e50;
  margin-top: 50px;
}
.center_div{
  margin: 0 auto;
  width: 80%
}
</style>
Todos.vue
<template>
    <div class="card-body mb-2 list-group ml-3">
        <p class="card-text" v-if="!todo_items.length">Your Todo List is empty. Add something! </p>

        <div v-bind:key="todo_item.id" v-for="todo_item in todo_items" class="list-group-item mb-2">
            <TodoItem v-bind:todo_item="todo_item"></TodoItem>
        </div>
    </div>
</template>
<script>
import TodoItem from './TodoItem.vue';
    export default {
        name: "Todos",
        props: ["todo_items"],
        components: {
            TodoItem
        }
    }
</script>

<style scoped>

</style>
TodoItem.vue
<template>
    <div class="float-left">
        <p>{{todo_item.title}}</p>
    </div>
</template>

<script>
    export default {
        name: "TodoItem",
        props : ["todo_item"]
    }
</script>
AddTodoItem.vue
<template>
    <div class="card-body">
        <form @submit="addTodo" class="form-inline">
            <div class="form-group col-md-8">
                <input type="text" class="form-control mr-3" v-model="title" name="title" placeholder="Add Todo item...">
            </div>
<div class="form-group col-md-4">
                <input type="submit" value="Submit" class="btn btn-info">
            </div>
        </form>
    </div>
</template>

<script>
    import uuid from 'uuid/v4';
    export default {
        name: "AddTodoItem",
        data(){
            return {
                title: ''
            }
        },
        methods: {
            addTodo(e){
                e.preventDefault();
                const newTodoItem={
                    title: this.title,
                    id: uuid()
                }
                //send to parent
                this.$emit('add-todo-event', newTodoItem);
                //clear the field
                this.title='';
            }
        }
    }
</script>

<style scoped>
    input[type="text"]{
        flex:10;
        padding: 5px;
    }

    input[type="submit"]{
        flex: 2;
    }
</style>
Wrapping up
Great job for reaching the end of this tutorial. This tutorial is geared towards all skill levels and we hope you learned something. If you are new to Vue.js, they have very nice documentation over at their website. What is next for you? You can try to implement methods to mark a todo item as complete, and a method to delete or edit a todo item and save it back to LocalStorage. You may find the complete source code to this tutorial at this Github repo.
Happy coding!