How to Fetch and Display JSON Data in HTML Using JavaScript

In this tutorial, I will show you how to fetch and display data from a JSON file using vanilla JavaScript.
So how will we achieve this?
First, we will fetch the JSON data by using the fetch API. This will return a promise with our JSON data. Then we will append the data dynamically by creating HTML elements on the fly. We will then append our JSON data to those elements.
Getting JSON data from an API and display it on a web page is a common thing you will do quite often. I have created similar posts on the big frameworks like React, Vue and Angular. Check it out if you are using any of those frameworks.
Let’s get started!
First, create a people.json file and fill it with the following data:
[
    {
        "id": "1",
        "firstName": "John",
        "lastName": "Doe"
    },
    {
        "id": "2",
        "firstName": "Mary",
        "lastName": "Peterson"
    },
    {
        "id": "3",
        "firstName": "George",
        "lastName": "Hansen"
    }
]
We will save this file in the same directory as our index.html file.
Fetching the JSON data
To be able to display this data in our HTML file, we first need to fetch the data with JavaScript.
We will fetch this data by using the fetch API. We use the fetch API in the following way:
fetch(url)
  .then(function (response) {
    // The JSON data will arrive here
  })
  .catch(function (err) {
    // If an error occured, you will catch it here
  });
urlfetchpeople.jsonindex.html
The fetch function will return a promise. When the JSON data is fetched from the file, the then function will run with the JSON data in the response.
If anything goes wrong (like the JSON file cannot be found), the catch function will run.
Let us see how this will look in out example:
fetch('people.json')
  .then(function (response) {
    return response.json();
  })
  .then(function (data) {
    appendData(data);
  })
  .catch(function (err) {
    console.log(err);
  });
Here we are fetching our people.json file. After the file has been read from disk, we run the then function with the response as a parameter. To get the JSON data from the response, we execute the json() function.
The json() function also returns a promise. This is why we just return it and chain another then function. In the second then function we get the actual JSON data as a parameter. This data looks just like the data in our JSON file.
Now we can take this data and display it on our HTML page. Notice that we are calling a function called appendData. This is where we create the code which will append the data to our page.
Notice that in our catch function, we are just writing the error message to out console. Normally you would display an error message to the user if something went wrong.
Displaying the JSON data
Before we display our JSON data on the webpage, let’s just see how the body of our index.html file looks like.
<body>
  <div id="myData"></div>
</body>
Pretty simple right? We have just a simple div with the id myData. Our plan is to fill our JSON data inside this div dynamically.
There are several ways to display the data in our HTML. We could create a table and make it look really good with nice styling. However, we will do this in a simple and ugly way.
Our goal is to just simply display the full name of the people in our JSON file.
Step 1 – Get the div element from the body
Remember the div with the myData id from index.html
This is how we will do it:
var mainContainer = document.getElementById("myData");
We get the element by executing the getElementByID function. This will find the element with the id myData. This is vanilla JavaScript and this is how we did front-end development in the “old” days :).
Step 2 – Loop through every object in our JSON object
Next step is to create a simple loop. We can then get every object in our list of JSON object and append it into our main div.
for (var i = 0; i < data.length; i++) {
  // append each person to our page
}
Step 3 – Append each person to our HTML page
Inside the for-loop we will append each person inside its own div. This code will be repeated three times for each person.
First, we will create a new div element:
var div = document.createElement("div");
Next we will fill that div with the full name from our JSON file.
div.innerHTML = 'Name: ' + data[i].firstName + ' ' + data[i].lastName;
Lastly, we will append this div to our main container:
mainContainer.appendChild(div);
That’s it. Now we have finished appending the JSON data to our index.html page. The full appendData function looks like this:
function appendData(data) {
  var mainContainer = document.getElementById("myData");
  for (var i = 0; i < data.length; i++) {
    var div = document.createElement("div");
    div.innerHTML = 'Name: ' + data[i].firstName + ' ' + data[i].lastName;
    mainContainer.appendChild(div);
  }
}
When we run our index.html page, it will look something like this:
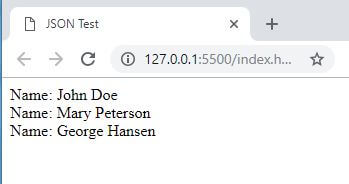
Not the most beautiful application, but it got the job done.
Let us look at the entire HTML file with the JavaScript:
<!DOCTYPE html>
<html lang="en">
<head>
    <meta charset="UTF-8">
    <meta name="viewport" content="width=device-width, initial-scale=1.0">
    <meta http-equiv="X-UA-Compatible" content="ie=edge">
    <title>JSON Test</title>
</head>
<body>
    <div id="myData"></div>
    <script>
        fetch('people.json')
            .then(function (response) {
                return response.json();
            })
            .then(function (data) {
                appendData(data);
            })
            .catch(function (err) {
                console.log('error: ' + err);
            });
        function appendData(data) {
            var mainContainer = document.getElementById("myData");
            for (var i = 0; i < data.length; i++) {
                var div = document.createElement("div");
                div.innerHTML = 'Name: ' + data[i].firstName + ' ' + data[i].lastName;
                mainContainer.appendChild(div);
            }
        }
    </script>
</body>
</html>
Try to copy and paste this in your own editor. As an exercise, you can try to style the output to look nicer. Remember to include the people.json file as well. This file must be in the same directory as your index.html file for this to work.
Why use Vanilla JavaScript?
You might be wondering what is the point of creating this in vanilla JavaScript. Doesn’t modern web application use frameworks and libraries like Angular, ReactJS or VueJS?
Well, yeah, you are probably right, most of the time. But some web pages are just static with very little logic.
If you just want to tweak some minor parts of the website, it might be overkill to include big libraries which will slow down the site.
Besides, frameworks and libraries come and go. Good old vanilla JavaScript is here to stay. So take every opportunity to learn it, you don’t know when you might need it.
Happy coding!